I had just started working with a new product, a web-based platform that was a fairly complex system with a large number of components, each with numerous features. Going into each component and inside every feature would take too much time; I needed a quick, broad overview and some feedback points I could share as queries or defects with my team.
I realized my exploration of the application would need some structure around it. Using test sessions and predefined charters, I could explore set areas and come back with relevant observations—I had discovered tours.
Cem Kaner describes tours as an exploration of a product that is organized around a theme. Tours help bring structure and a definite direction to exploration sessions, so they can be used as a fundamental tool for exploratory testing.
Tours are excellent for surfacing a collection of ideas that you can then further explore in depth one at a time. Tours testing provides a structure to the tester on the way they go about exploring the system, so they can have a particular focus on each part and not overlook a component. The structure is combined with a theme of the tour, which provides a base for the kind of questions to ask and the type of observations that need to be made.
In the course of conducting a tour, testers can find bugs, raise questions, uncover interesting aspects and features of the software, and create models, all done on the basis of the theme of the tour being performed.
Let’s discuss some common types of tours that are useful for testers and look at some examples.
Application Tours
An application tour traverses the application screen by screen, with the aim of exploration as well as learning the application.
This is the first kind of tour I used, as an exploration method for my new project, by investigating all the screens one by one, noting the options and features present, and getting familiar with the application.
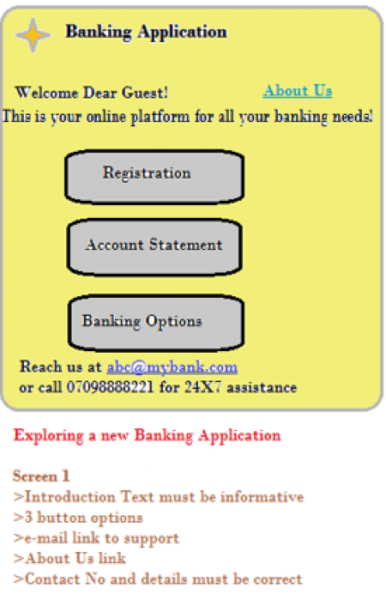
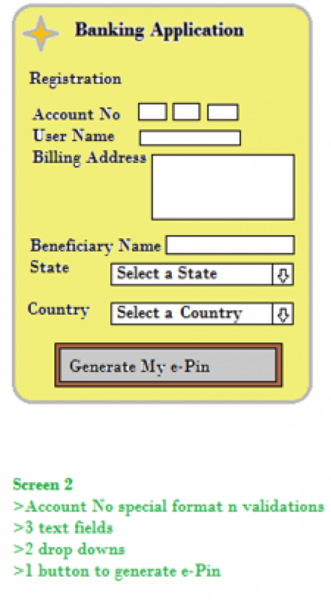
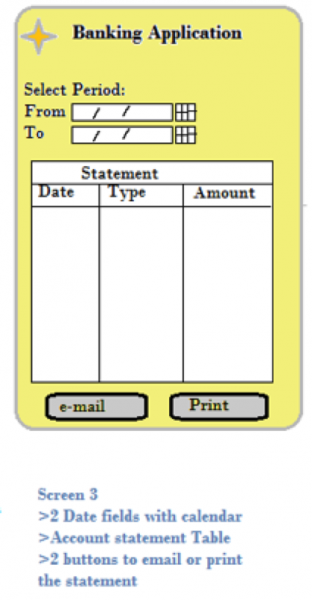
Let’s look at a sample banking mobile application with three screens. The first screen is the welcome screen with options, the second is the registration screen, and the third is where we can fetch our account statement based on the time period range we select.
Here are the details of our application tour, which gives us a general overview of the app.
Feature Tours
After becoming familiar with the application through the application tour and noting my interest areas and observations, I proceeded to perform a feature tour.
For this I selected a concerned test area and tried out all the features of that area. I customized this tour a bit by focusing on the most used and most valuable features, which I needed to learn for my upcoming user stories.
In a feature tour , the tester is encouraged to move through the application and get familiar with all features they come across. It can be used for the purpose of learning as well as checking the functionality. Along with the most common features, the tester may also try out the less popular features of the application, as time and exploration permit.
For example, let’s conduct a mock feature tour of Microsoft PowerPoint. First we’ll start with adding a new slide. Our tour will focus on the “Insert” features in the “Add Slide” contents.
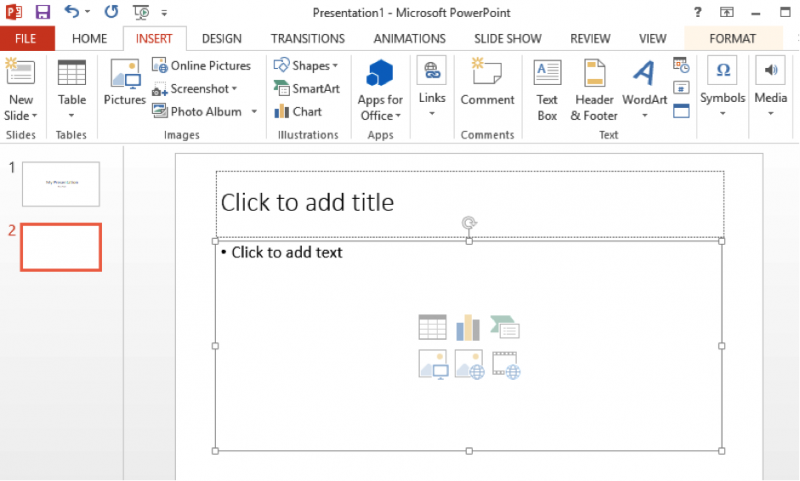
On the new slide, the default options that appear are “Add Header” and “Add Body.” Inside the “Add Body” option, the tour should include all the feature options available, one by one—table, chart, picture, etc.—looking at the dialog boxes that pop up and touching on each available option.
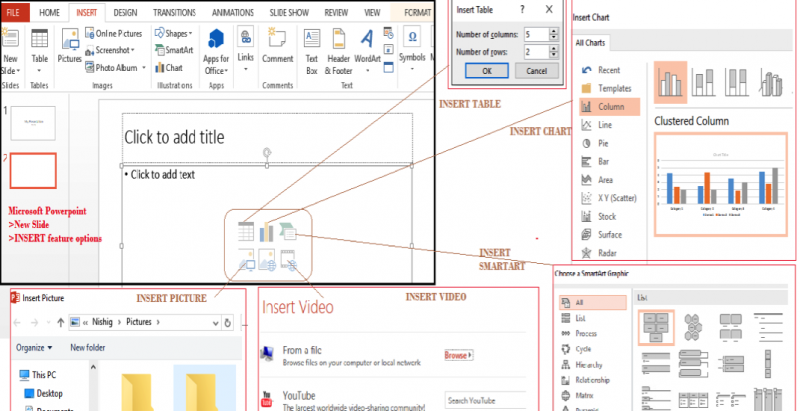
Of course we do not need to go into exhaustive detail for each feature. The only thing we are looking for is a structure and direction. This tour lets us pick where to focus more time and effort, while other features we may choose to just touch upon.
Menu Tours
Menu tours navigate through all menus and submenus in the app, visiting each one for understanding and checking.
I used a menu tour as a structured charter for a one-hour test session, traversing all menus, submenus, and items in the application. This brought me final clarity of what I needed to know about the application, the use of various options, and what lay within each one. I was free to go and explore the ones I needed in detail later.
Here’s how to perform a menu tour:
- Go through all menus and submenus available in the application.
- Check for context-sensitive menus that become active or inactive under certain situations.
- Check for context-sensitive menus that come up with a right-click.
- Check for shortcut keys to activate menus and features.
- Look for option settings that reveal new features.
- Look for user-dependent features or menus.
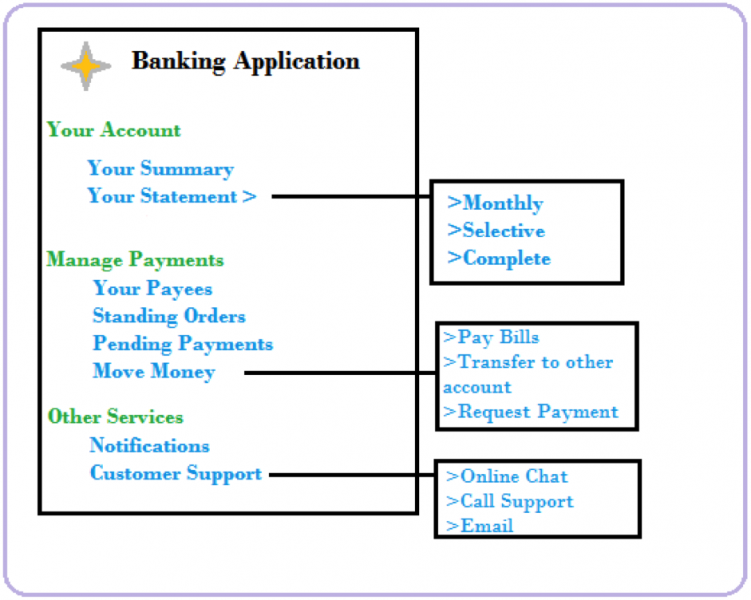
If required or if you find it useful, you may record all the options in these menus and submenus as lists, diagrams, screenshots, or mind maps. Let’s go back to the banking app example to demonstrate. A menu tour traverses all the menu and submenu items with the above pointers in mind, and you could diagram it as below.
All these tours helped me speed up my learning and perform my exploration of applications in a directed manner. You can adopt these tours as a part of your functional tests, exploratory cycles, or system tests.
Other Types of Tours
Depending on your testing needs and context, there are even more tours you could perform:
- Documentation tour: In this tour, you explore the user manual and help guide of the product and check the instructions for correctness of information provided, updates made for the new release features, user-friendliness, and the ease of understandability of the documentation.
- Interoperability tour: Thistour aims to investigate the interaction of the system with third-party apps and systems, focusing only on the interface points of the applications.
- Continuous use tour: Here, you tour the system for long, ongoing usage with multiple screens and files open for a prolonged duration in order to observe memory usage.
I hope this introduction helps you start performing tours as part of your exploratory test sessions so that you can be more deliberate with your observations, craft more useful tests, and better understand your products.


User Comments
Nice article! I recommend documenting the tours made similar to what is shown in the examples in the article. That way others can more easily consume the test results and a tester can repeat the same tour at a later point. No matter of exploratory or any other kind of testing: if you do not document the results you did not test it!